![[callsign]KTF](http://4.bp.blogspot.com/-gnVang4D1o8/T0RMlS8Ay5I/AAAAAAAAAB4/cCGCzOyU_6g/s1600/KTF%2BBanner-Mountain.jpg)
 Two years ago, the natural expansion of my
daughter’s family required that her two young boys bunk up together in the same
room… the price of acquiring a new sister. The older one faced moving from a novelty single bed, in the
shape of a safari jeep, to a perhaps more standard bunk setting. This is where the idea to build a set
of novelty bunks came into being.
The initial request was for a London double decker bus, but it’s
interesting how various experiences come together to mold unexpected
outcomes. At the time, I was
reading a series of 27 novels by Alexander Kent that involved the British Navy during
the late seventeen hundreds, and quite by accident, my daughter saw a picture
of another set of pirate ship bunks while looking at a real estate property
online. The pictured bunks were a
little abstract, and so, as men do, I sought to improve on a good idea.
Two years ago, the natural expansion of my
daughter’s family required that her two young boys bunk up together in the same
room… the price of acquiring a new sister. The older one faced moving from a novelty single bed, in the
shape of a safari jeep, to a perhaps more standard bunk setting. This is where the idea to build a set
of novelty bunks came into being.
The initial request was for a London double decker bus, but it’s
interesting how various experiences come together to mold unexpected
outcomes. At the time, I was
reading a series of 27 novels by Alexander Kent that involved the British Navy during
the late seventeen hundreds, and quite by accident, my daughter saw a picture
of another set of pirate ship bunks while looking at a real estate property
online. The pictured bunks were a
little abstract, and so, as men do, I sought to improve on a good idea.
Without a plan, I determined that the first
improvement should be a ship with curved sides. Having no experience in wood steaming, I opted to laminate
strips of pine around a jig.

I only had one
jig and limited clamps (One can never have too many clamps), and so it took
several days to acquire enough for the frame.

Once the frames were completed they were clamped together for dressing to ensure a constant curve.

As the lower bunk area represents the lower deck of a windjammer, the supports for the upper bunk were designed to appear chunky for effect.

Without any formal training in woodworking, my strategy is always to put things together dry and adjust anything that wobbles, protrudes or allows daylight to pass through. Here is a frame laid out for adjustment inspection.

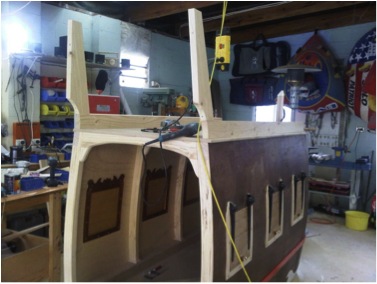
Each set of side frames were built separately and later joined by screwing on the top and bottom beams. All through the build I had to keep in mind the weight and dimensions of each chunk, because the final product needed to be assembled on the second floor of a house with cornering staircases.

The frame finally takes form.

Another set of laminated curves was required for the bow section, so here it is matched exactly with the cabin.

The bow shaped is formed using some MDF scrap…. Make sure you get all of your mathematical calculations off it before laminating the deck timbers over the top of them. How useful would a notepad be in a workshop I wonder?

Once again, in areas where the construction timber will be covered up, I try to use materials I have laying around. This is the back of the forward bulkhead with a bookcase cut into it so the lower deck crewman has some shelving inside.

With the bow shaped ends connected and a bit of framing for support, the planking was added amid frequent snapping and several laps of the back yard spent searching for myself. Compound curves and inconsistent flexibility of thin ply almost caused this project to revert to a London bus shape instead.

Having created a large proportion of the big bits, the focus then turned to the detail. In an effort to create working cannon flaps I used a jig to glue up hardwood strips with the same curve as the hull sides. (Tasmanian Oak… which is Australian for some kind of Eucalyptus tree that doesn’t even lose its leaves in winter.)

Due to the curved shape of flaps and the absence of iron strap hinges, I opted to make my own from timber. Here is a finished flap with the rest of the raw ones in the background. Sometimes I get impatient to see the end product so I make a complete one to keep me inspired through the multiplicity ahead.

Back to the big bits; the planked bow section complete with bookcase and wiring for the internal light switch.

The bow and cabin frame together at last.

The frame receives its outer skin of plywood. Later I used a ball point pen to score (pretend) plank joins into the ply sheeting, using the position of the bow planking as a guide for the cabin.

After the sheet is applied, the lower deck gun ports are cut and test framed externally. More clamps!

Here the lower sheeting is applied to complete the hull to the apparent waterline.

The internal gun ports are also framed, after cutting a matching curve to alleviate the possibility of the frames straightening out the outer skin.

The interior frames are designed a little fancier than the external frames.

Here the bow and cabin are mated, the bow stem added, the cabin stained and the beginnings of the wave pattern left clean.

Back to the small bits. I needed four strong cannon barrels so I cut eight sections of pine that would fit together on an MDF blank, ready for turning and already having a hollow center. I glued them up and held them together with book binding tape until dry.

This is how the barrels looked before painting.

Next the cannon port flaps and a bit more work on the waves below. The cannon port flaps are rigged to work from inside.

These old wooden sailing ships were very ornate, so at the rear a mix of timbers and fancy carved bits were put together to create that effect.

Eventually it was time to start on the upper deck.
The upper deck has the four cannons poking out and the framing doubles as a safety rail.

The aft planking is added in small strips to allow that piratical curved stern. The cannon ports are painted black and a window is cut for the Captain’s Cabin. There is an outer skin for the top deck sides that is screwed on last during assembly. This allows the framing to be screwed on first and hides all the screw heads.

This is one of the side skins for the upper deck. Without our clamps we would be helpless.

I purchased a book about naval carving along the way. From this book I lifted a plaque design and created a blank made of Tasmanian sassafras. The lettering is just commercial MDF craft supply, and the name derived from the imagination of my younger brother.

A bit of shaping and a bit of stain and it looks much more authentic.

At one of our local markets I scored a bag full of turned spindles so I was able to incorporate a fancy rail around the upper deck rim.

As the main cabin and upper deck approaches completion, the focus turns to the ornamental aspects of the bow.
A cheaply purchased horse head made from some equatorial softwood was easily re-shaped into a sea horse figurehead. I did make an error later on when cutting a slot for the bow rail, but a patch and some filler, followed by some paint…. Mistake? What mistake?


The forward deck was covered with thin strips of pine alternating with thinner strips of dark hardwood.

Another structure of Tasmanian Oak is added to provide a mount for the ship’s wheel. The gap behind this structure is where the ladder can be attached from either side.

Another shaped rail built up with laminations forms the bow rail when incorporated with another bunch of taller market spindles I found.


The finished bow area complete with an ornamental ship’s wheel that was once a barometer.

I made a ladder but got so engrossed in its construction I forgot to take pictures of every step.

Clear varnishing all the parts required a lot of space and time.

To my great relief, all the parts went up the stairs and through the available door openings… the ship by virtue of its size, had to be faced into a corner of the room, and filled the area so well it was difficult to obtain a full image of it. The whole build took about 60 days and I think I’m safe in stating that it’s one of a kind.


True story: Tim and his college roommate turned their lofted dorm room into a pirate ship that the admissions staff routinely used in the tour of the university. Granted, it didn't hold a flame to the craftsmanship of this project but I think it goes to show- no matter how old you get part of you stays in Neverland. Or maybe that's just Tim...

Have something you want to share with the KTF crew? Send your article to KTFauthors@gmail.com!
No comments:
Post a Comment